Wednesday, December 14, 2011

Candy Cane Chocolate Whoopie Pies!

Ya know those Inspired recipe magazines at Sobeys? They're pretty awesome. The holiday themed one that's out now is filled with tons of easy and delicious recipes, like this one!


CANDY CANE CHOCOLATE WHOOPIE PIES 
PREP TIME: 15 min. TOTAL TIME: 45 min. MAKES: approx. 20

You will need:


- 1 cup all purpose flour
- 1/4 cup cocoa
- 1 tsp baking soda
- 1/2 tsp salt
- 3/4 cup + 2 tbsp milk, divided
- 1 tsp vanilla extract
- 3/4 cup unsalted butter, room temperature, divided
- 1/2 cup brown sugar
- 1 egg
- 1/4 tsp pure mint extract
- 2 cups icing sugar
- 3/4 cup crushed candy canes
 

1. Preheat oven to 350°. In a bowl, sift together flour, cocoa, baking soda and salt. Set aside. In a measuring cup, stir together 3/4 cup milk and vanilla. Set aside.

2. Using an electric mixer, cream together 1/4 cup butter and the brown sugar until pale and fluffy, then add egg. Alternately add portions of the dry ingredients and milk mixture, finishing with dry ingredients. Beat until smooth batter forms.

3. Using a table spoon, portion out level spoonfuls of batter and place mounds, spaced about 1.5 inches apart, on 2 parchment lined baking sheets. Bake for 11 minutes, rotating half way through. Let pies cool completely.

4. Meanwhile, make the filling. Using the mixer, whip remaining butter until fluffy, then add mint extract and remaining milk. Gradually add icing sugar. Beat until fluffy, cover and set aside. 

5. Fold crushed candy canes into filling. Sand which level tablespoons of filling between two pies.

Serve immediately, or refrigerate for later! :)


I found the filling to be verrrry sweet. Too sweet for me. So if you're not big on things being super sweet I'd suggest using cool whip and adding the mint extract and candy canes.
 
This batch is for a cookie party I'm attending tomorrow with the girls from my class, so hopefully they won't mind the sugar!


lol. This apron was actually a part of my Raggedy-Anne Halloween costume that my Nan made me when I was 12. I've been using it as an apron ever since. :)

Hope you enjoy the recipe! There's sure to be more as we get closer to Christmas
11 DAYS!

Sunday, December 11, 2011

Eggnog Smoothie Recipe!


- 2 cups of frozen yogurt
- 1 cup eggnog
- 1 banana
- 1/4 tsp nutmeg
- 2 oz spiced rum

*serves two

Pure Perfection.
Enjoy.


Thursday, December 8, 2011

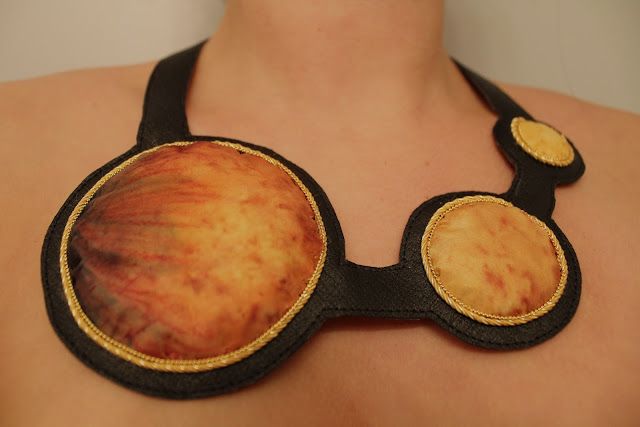
Tattooine Neckpiece


Title: Tattooine

Materials
- naturally hand-dyed habotai silk with madder, safflower, pomegranate, logwood, cochineal and indigo.
- repurposed leather
- goldwork: Grecian Twist (0.5% gold) , Pearl Purl


About two weeks ago I wrote asking for your help deciding which design(s) to make. At that point in time I had intended to make two of my four designs. I didn't anticipate that these would take forever to make, so I only ended up with one complete neckpiece....for now. 

Click here to read about my inspiration and to view my other three designs.


I'm pleased with the outcome. Can't wait to make another to get it absolutely perfect.


What do you think? Is this something you would wear? I'm curious to know how people feel about bold-textile-art jewellery and accessories....

Wednesday, December 7, 2011

Anya Caliendo!

After a few stressful and hectic days a beacon of light as shone my way! I finally received my package from Anya Caliendo which includes my proof of registration! It's really happening...I'm going to millinery school in New York!!!!!


YAYAYAYAYAYYYYYYY!

Tuesday, December 6, 2011

Christmas Paper Globes How-to:


So here's a little tutorial for ya! It's been a while since I've done one so I figured you deserved it, and I deserved a break from my school work. :P

These paper globes make great Christmas tree ornaments but also look great piled into a glass bowl and used as a centrepiece. 

You will need:
- strips of decorative paper cut into even lengths and widths. 
- 2 paper fasteners
- large needle 


Step #1Pierce the end of each piece with a large needle (I use a felting needle).


Step #2. Push the paper fasteners through each hole, starting with one strip and adding the rest one at a time.


 Step #3. When they are all on split open the fasteners and fan into a globe shape.


If you'd like to hang your globe attach some thread, or fishing line.


Hope you're all getting psyched for Christmas! I sure am!!!